Paddling Technique
An outrigger is pulled not pushed through the water. To do this, paddlers need to reach out, grab the water and drag the canoe forward. Most blades also have a bend (usually around 10 degrees, held with the blade bending away from the paddler) which increases the lift of the blade as it enters the water. This effectively pulls and lifts the canoe to decrease the canoe surface area and the water resistance. Lift is achieved by focusing power at the front of the stroke.
The paddle should exit the water when it reaches the paddlers mid-thigh to hip. Extending the stroke beyond this point decreases the lift generated and increases drag. Synchronised paddling; with all paddles entering and exiting the water at the same time and all paddlers using the same technique; provides the maximum pull and lift for the minimum effort. This can only be achieved through developing a consistent paddling technique both individually and as team, it requires practice, practice & more practice.
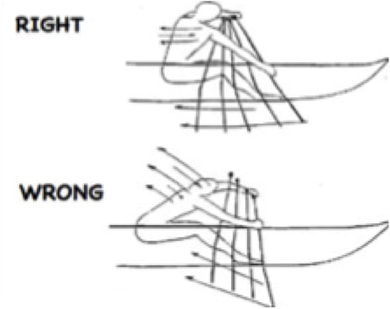
Rotating from the hips allows paddlers to apply leverage and deliver maximum pull through the water. Twisting the upper body instead of using the arms utilises stronger muscle groups and minimises fatigue. This reach and twist motion requires flexibility. Locking the lower body and arms also results in less rocking of the canoe creating a consistent streamlined hull. Paddlers should maintain a straight line up the spine, twisting around this plane, with heads up and all in a row. The optimum degree of lean (forward) is influenced by the paddler. Smaller paddlers may use a dynamic approach where they lean forward a little (10-30 degrees) at the start of the stroke to increase reach and then straighten during the stroke to provide power. Others should focus on a static approach with minimum lean and no
forward/backward body movement. Inappropriate lean increases lower back stress and should never be excessive, larger paddlers should always adopt a static style.
Set Up Phase
The stroke commences.
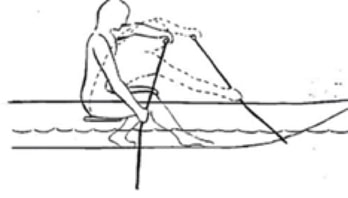
Maximum reach and twist from the hips/waist (rotation) with the paddle blade just out of the water.
Plant the blade. Push the blade cleanly into the water smoothly.
An outrigger is pulled not pushed through the water. To do this, paddlers need to reach out, grab the water and drag the canoe forward. Most blades also have a bend (usually around 10 degrees, held with the blade bending away from the paddler) which increases the lift of the blade as it enters the water. This effectively pulls and lifts the canoe to decrease the canoe surface area and the water resistance. Lift is achieved by focusing power at the front of the stroke.
The paddle should exit the water when it reaches the paddlers mid-thigh to hip. Extending the stroke beyond this point decreases the lift generated and increases drag. Synchronised paddling; with all paddles entering and exiting the water at the same time and all paddlers using the same technique; provides the maximum pull and lift for the minimum effort. This can only be achieved through developing a consistent paddling technique both individually and as team, it requires practice, practice & more practice.
Rotating from the hips allows paddlers to apply leverage and deliver maximum pull through the water. Twisting the upper body instead of using the arms utilises stronger muscle groups and minimises fatigue. This reach and twist motion requires flexibility. Locking the lower body and arms also results in less rocking of the canoe creating a consistent streamlined hull. Paddlers should maintain a straight line up the spine, twisting around this plane, with heads up and all in a row. The optimum degree of lean (forward) is influenced by the paddler. Smaller paddlers may use a dynamic approach where they lean forward a little (10-30 degrees) at the start of the stroke to increase reach and then straighten during the stroke to provide power. Others should focus on a static approach with minimum lean and no
forward/backward body movement. Inappropriate lean increases lower back stress and should never be excessive, larger paddlers should always adopt a static style.
Set Up Phase
The stroke commences.
Maximum reach and twist from the hips/waist (rotation) with the paddle blade just out of the water.
- Paddle blade perpendicular to canoe hull.
- Lower hand around 1 hand width from the start of the blade face.
- Top hand should not be outside the canoe.
- Bottom arm with minimal bend and locked.
- Top arm slightly bent and locked.
- Leading leg (paddle side) extended and firmly planted to drive power into the canoe. Offside leg bent under the seat.
- Both legs (knees) braced against canoe to lock the paddler in.
- Straight back, possibly a small forward lean.
- Head up, chin forward, breathing is important.
- Basically your arms and shoulders should form a "big C".
Plant the blade. Push the blade cleanly into the water smoothly.
- Everyone at the same time.
- Drop bottom shoulder to move arms down and drive the full blade into the water up to the neck.
- Strive for a clean entry (no plonking) by maintaining the paddle perpendicular to the canoe and entering the water at the speed (horizontal paddle movement) of the canoe.
- At this stage you are not pulling the canoe just getting the blade planted.
Catch Phase
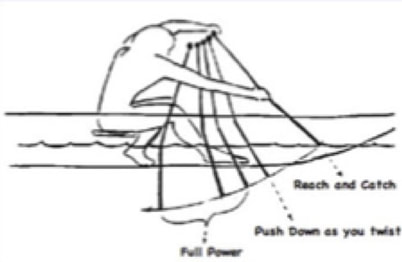
This phase commences once the full blade is in the water and can be considered as the preparation for the power phase. It delivers lift to the canoe and minimises drag on the canoe. Pull the canoe through the water.
The blade is now aligned with the maximum surface area and the canoe is ready to absorb the surge of power. Pull with power.
This phase occurs once the blade reaches the mid-thigh to hip. Leaving the blade in the water past this point increases drag.
Return the paddle to the Set Up Phase.
This phase commences once the full blade is in the water and can be considered as the preparation for the power phase. It delivers lift to the canoe and minimises drag on the canoe. Pull the canoe through the water.
- Start body rotation and apply pressure to the top hand, this moves the canoe forward and creates lift.
- Do not rock the top hand as the blade will pivot in
- The paddle shaft moves toward the vertical and becomes fully anchored.
The blade is now aligned with the maximum surface area and the canoe is ready to absorb the surge of power. Pull with power.
- Drive with the extended leg.
- Rotate with locked arms.
- Straighten upper body.
- Focus on pulling the canoe through the water creating a power surge.
- There should be no cavitation around the blade
This phase occurs once the blade reaches the mid-thigh to hip. Leaving the blade in the water past this point increases drag.
- Everyone at the same time.
- Rotation is complete and the blade is quickly removed from the water by rolling the shoulders to lift the bottom and drop the top hand.
- Some bend naturally occurs in the bottom arm or wrist at this stage.
- There should be no power applied, focus on getting the blade clear of the water.
Return the paddle to the Set Up Phase.
- Relax and recover.
- Twist top wrist to feather the blade over the water.
- Rotate back to the set up position, straightening the bottom arm.
- Keep bottom hand travel parallel and just off the canoe side.
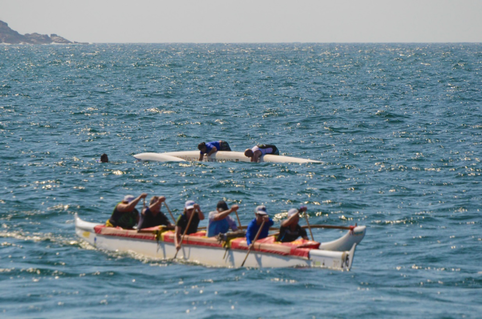
Huli Recovery
INTRODUCTION
A Huli is when the canoe capsizes, normally to the opposite side of the ama. A Huli can happen at any time with little or no warning.A novice crew, a beginner steerer, or rougher waters can cause the boat to capsize. A Huli is very common and can happen during a practice or a race. It is more common for boats to Huli during a race. Contact with other boats, wake, or extra boat speed and paddler effort may cause the boat to Huli.
Below are the steps and procedures to right the boat and to continue paddling.
When a Huli happens during a race, the boat is expected to continue the race.
The best Huli procedure is to prevent the Huli by making sure that all paddlers:
- Are sitting up;
- Not leaning over the gunnels;
- Not throwing their body weight across the canoe during a change;
- Letting the boat roll under their bodies and being flexible.
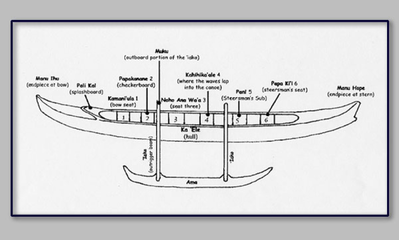
Outrigger Component/Names
ROLES
Once you surface make sure the rest of the crew has also surfaced. The steerer is to call out a count where each paddler should number off, 1. 2. 3. etc. You must assist any other paddler who is having any difficulties. Let others know if someone is having difficulties so they can assist. Once everyone is accounted for then proceed to your allocated roles as per below:
SEAT 1 You are in charge of gathering the paddles and personal gear that may be floating away. Don’t swim away from the safety of the canoe to retrieve non-essential gear like hats and water bottles etc.
SEAT 2 You climb over the canoe using the iakos (wooden bars that connect the ama to the canoe). Once out of the water and on top of the boat, turn and face the ama. Place one or two feet on the muku. Place your hands on the iako. If you cannot reach, grab the gunnel of the canoe. When everyone is ready, you will pull the boat towards you as the ama is being lifted, and flip the canoe back upright.
SEAT 3 You will swim to the ama. Once seats 2 & 5 are ready on the muku, you will push the ama up by doing a big scissors kick with your legs to help in getting it out of the water.
SEAT 4 Your job is the same as seat 3
SEAT 5 Your job is the same as seat 2
SEAT 6 You are the captain. You must check to make sure all paddlers are accounted for. You must assist in the execution of the Huli recovery and be able to offer verbal or physical assistance.
1. The steersperson is in charge of the boat. If there are any paddlers that are in need of assistance, the stern (or next best suited to help) will take control.
2. The first step once in the water is to gather yourself. There is a major initial shock to the body and often prevents logical, common sense thinking.
3. If you are having a problem, hold onto the canoe. Shift your way down the boat (with the sterns assistance) and hold onto the stern end of the canoe.
4. Do not climb onto another paddler or the ama. This will sink the ama making it heavier, or possibly injure a second paddler.
5. Do not lose your paddle. Hang on to it! Give it to seat 1 if you cannot perform your job and hold the paddle at the same time. Seats 3 and 4, should be able to maintain their own paddle during the Huli recovery
GET IN POSITION
1. Each seat has a dedicated job (as posted above). Once you and your crew are stabilized, get into position to right the boat.
2. Changes to responsibilities: a taller paddler may exchange roles with a smaller paddler when taking on responsibilities of seat 2 or 5. Due to a longer reach, they can often grab the iakos further away and offer more leverage to pull the boat over.
3. Talk! Work as a team. Let everyone know when you are ready, or if you need any assistance.
4. If the waves are big, turn the boat around so the boat is perpendicular to the waves.
1 - 2 - 3 - GO!
1. Once everyone is ready to go, count it down. We need everyone to pull at the same time.
2. It doesn’t take a lot of energy to right the boat, but if not done together, it can be very difficult!
3. Be careful that the Ama does not land on anyone.
ENTERING AND BAILING
1. Everyone must enter the boat from the ama side. This is very important. If not done, you may cause the boat to flip back over.
2. If you cannot pull yourself into the canoe, use the iako to help you get into position.
3. Do not worry about getting back into the same seat. Only seat 6 has to end up back in the stern position.
4. The smallest paddler enters the boat first and uses the bailer and quickly starts emptying the boat.
5. Seat 1 places paddles in the boat, (do not worry about correct paddle distribution)
6. Seat 6 is the second to enter the boat and keep the boat pointed in the right direction.
7. If there is a cover, the boat will not be full of water and the paddlers can start entering the boat.
8. If there is no cover, the paddlers must make sure the boat is bailed enough before they enter. If the boat is too full of water, it may swamp if all paddlers were to enter. Watch the gunnels. Make sure that the boat is high enough out of the water.
9. Generally, do not bail from outside of the boat as this is energy consuming and may make it difficult to pull yourself into the boat. If, however the canoe is significantly swamped then initial outside bailing may be necessary until the gunnels are well clear of the water. If the canoe is swamped, you may have to “Double” Huli it to clear enough water to raise the gunnels above the waterline.
10. The remaining paddlers get in as quickly as possible.
11. When bailing, rapidly throw the water over your shoulder. It is a fast swinging motion, do not place the bailer in the water, then pull it out, and then empty it over the side. Rapidly scoop and throw.
During cold weather, enter the boat as soon as it is safe to do so. Get out of the water. Help any paddler that is having difficulty getting in the boat.
START PADDLING
1. Once everyone is in, seats 1 – 2 – 5 – 6
–start paddling.
2. Seats 3 and 4 continue to bail.
3. Seat 3 starts paddling when 80%off the water out of the boat
4. Seat 4 continues to bail until 95% of the water is out. Any water in the bottom of the canoe will cause a heavy boat and make it hard to steer and paddle.
Once we are paddling, assess the situation.Is this a race or practice? What is the weather?
If any paddler is cold and shivering, turn the boat around. Start paddling to warm yourself up.
A Huli recovery can be done in less than 15 seconds. A Huli is common and needs to be considered as part of outrigger paddling. All paddlers will Huli during their time in a boat. It is a requirement of AOCRA that all paddlers participate in an annual Huli Drill.
Take a second to gather yourself and then execute as a team!
If you are not sure or need further explanation, please address the club coach
